
The cable plan is valid for the mounting surface that is currently the focus. You can create individual cable plans for the other mounting surfaces in the project (if existent).
-> Prerequisites:
A completed PV system must be present in order to create a cable plan. That means that the PV modules must be connected to an inverter.
The workspace cable plan consists of 5 toolbar parts:
Display of the cable plan using the "Views" toolbar
|
|
Display/do not display module cable (black).
|
|
|
Display/do not display string cable, DC trunk cable and DC main cable (red/blue).
|
|
|
Display string color/ only display black/white for optimization of the printout |
Hold down the middle mouse button to shift the view.
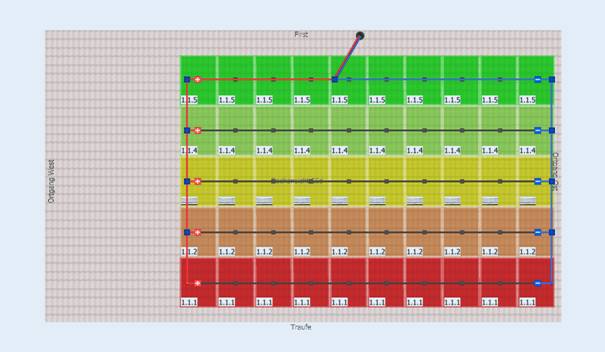
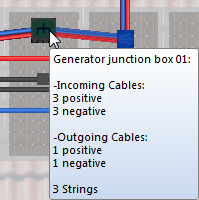
If you move the mouse pointer over a cable node, the following information will be displayed:
|
|
|
String identifier
 1st digit = inverter number
2nd digit = MPP tracker number
3rd digit = string number
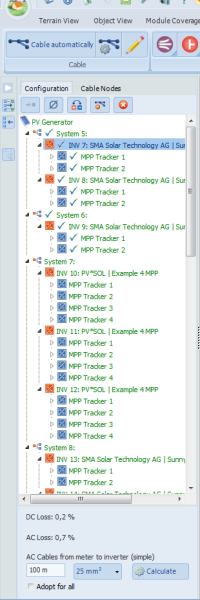
The side menu for the cable plan comprises two areas:
Top: tree view of the configuration with the button bar
|
|
All module configurations of all systems in the project are displayed in the top side menu. The The module strings can be selected and edited here. Various different actions can be carried out respective of the selection: |
Context menu - electric nodes
|
|
--> Links the selection with a cable node Set the cross section of the string |
|
|
--> Deletes the selected module cable and string cable --> Deletes all cables in the cable plan |
These actions are also located in the button bar in the side menu.
Context menu - without selection
|
|
--> Deletes the entire cable plan of the visible mounting surface. |
-> Also see: Edit module configuration (side menu)
Bottom: tree view of the cable nodes with the button bar

Select and edit cable nodes over the tree view. Multiple cable nodes can also be selected for editing by Multiselect. Various different actions can be carried out irrespective of the selection:
Context menu - cable nodes
|
Connect automatically Edit |
--> Links the selected cable nodes with a cable node --> Opens the cable node dialog window --> Rename the cable node --> Determining the target node of an automatic cabling --> Opens the cable node dialog window |
|
|
--> Deletes the selected cable node(s) --> Delete all cable nodes |
These actions are also located in the button bar in the side menu with the exception of Connect automatically.


 tick indicates that the electrical node has been completed.
 Cabling with ...
 Set cable cross-section
 Change polarity
 Remove
 Remove all cables
 Cabling with ...
 Rename
 Remove